
15 Most Recent [RSS]
More...
|
iBook disassembly
Recently, my Dad's Pearl White iBook G3 had a hard disk failure, and yesterday I sat down to disassemble it to replace the disk with a new 40GB notebook hard disk I'd bought at a local PC parts dealer. I've taken apart an iBook once before, and so I made sure I had ample of time and I prepared everything for a methodical and orderly disassembly:
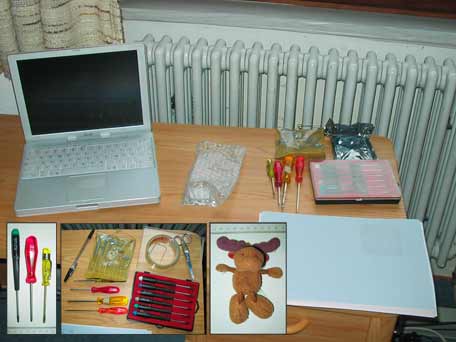
But don't worry, you don't need all of that. All I actually used was the Size 8 Torx screwdriver, the small Phillips screwdriver, the small regular screwdriver, the 2mm Allen wrench and a thin wooden 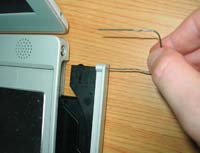 Shish Kebab stick (or oversized toothpick). You'll also want a pen and paper ready, and clear tape and scissors. If the CD drive is closed, you'll also want to get a straightened paper clip (Die Clippy! DIE!!!). Shish Kebab stick (or oversized toothpick). You'll also want a pen and paper ready, and clear tape and scissors. If the CD drive is closed, you'll also want to get a straightened paper clip (Die Clippy! DIE!!!).
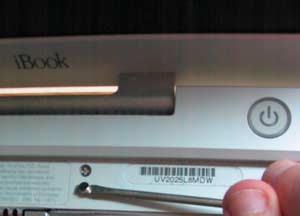
As always, you'll want to backup any data you may have on this old Mac, then shut it down and remove the battery and power cord. If you haven't done so already, abuse poor old Clippy's corpse. Stick one end into the little hole at the left of the CD tray and push. That'll unlock the tray and you can easily slide it out. While you're preparing things, you might want to put a few pieces of paper between the display and the keyboard, to ensure you're not scratching the display.
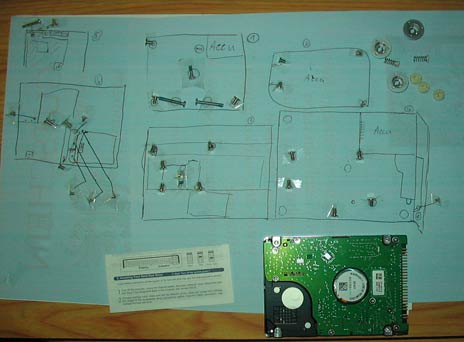
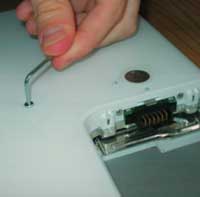 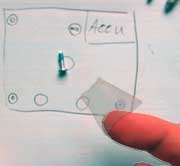 Once that is done, bow to Our Great Overlord the Radiator (i.e. touch it to get rid of any static electricity). Then turn the iBook upside down so you can see the three Allen screws and take them out. Here's where the pen and paper comes in: You'll be removing lots and lots of screws of different shapes and sizes, so draw little pictures of the iBook on the paper and mark where the screws go, and each time when you've pulled a screw, tape it to the drawing, so you'll know where to put each one later. Once that is done, bow to Our Great Overlord the Radiator (i.e. touch it to get rid of any static electricity). Then turn the iBook upside down so you can see the three Allen screws and take them out. Here's where the pen and paper comes in: You'll be removing lots and lots of screws of different shapes and sizes, so draw little pictures of the iBook on the paper and mark where the screws go, and each time when you've pulled a screw, tape it to the drawing, so you'll know where to put each one later.
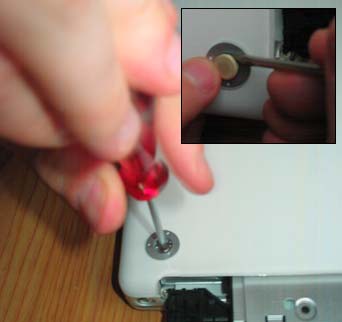
There are three more screws in the back of the iBook. They're hidden under the rubber feet. So, take the small screwdriver and carefully push it between the rubber foot and the metal ring around it. Poke around a little and you should push on one of three small plastic latches that keep the foot secured. 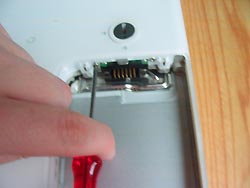 They may end up being catapulted out if you're not careful. Once the feet are out, use the Phillips screwdriver to pull out the screws. You will notice that the metal rings are actually Woks, and that they come out easily. take note that there are three holes and three struts in each Wok, and that one of the struts is slightly flattened. They fit into a large and small latch in the hole, and will only fit if you put them in with the same orientation again. Put them in a safe place (tape them to the paper if you want). It's important not to be too rough with the rubber feet. The actual latches are plastic and break easily. There's also four additional screws in the battery compartment that you'll want to pull: Two right next to the contacts for the battery and two in the opposite corners. They may end up being catapulted out if you're not careful. Once the feet are out, use the Phillips screwdriver to pull out the screws. You will notice that the metal rings are actually Woks, and that they come out easily. take note that there are three holes and three struts in each Wok, and that one of the struts is slightly flattened. They fit into a large and small latch in the hole, and will only fit if you put them in with the same orientation again. Put them in a safe place (tape them to the paper if you want). It's important not to be too rough with the rubber feet. The actual latches are plastic and break easily. There's also four additional screws in the battery compartment that you'll want to pull: Two right next to the contacts for the battery and two in the opposite corners.
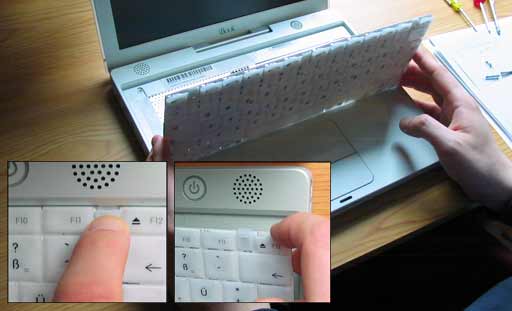
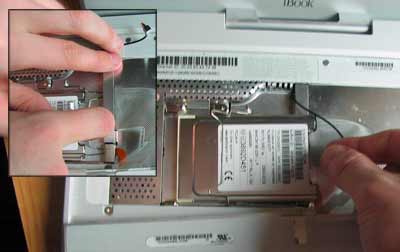 Now you have pulled all outside-accessible screws from the bottom, so let's get to the top. Turn the iBook around and open it. Then take out the keyboard by pulling on the left and right little plates between the F-Keys. Once you've pulled them back you can lift out the keyboard top to get access to the goodness underneath. If you have AirPort, unplug the AirPort card's antenna cable and pull on the little metal thing so its two tips come out of their holes at the right. Don't worry, this wire is sturdier than it looks. You can now turn it up and just pull out the Airport card. Now you have pulled all outside-accessible screws from the bottom, so let's get to the top. Turn the iBook around and open it. Then take out the keyboard by pulling on the left and right little plates between the F-Keys. Once you've pulled them back you can lift out the keyboard top to get access to the goodness underneath. If you have AirPort, unplug the AirPort card's antenna cable and pull on the little metal thing so its two tips come out of their holes at the right. Don't worry, this wire is sturdier than it looks. You can now turn it up and just pull out the Airport card.
 Next you'll want to take out the screw in the upper left as well as the two to the left of the AirPort slot, and the one to its lower right. There are also two screws in a groove. Remove those to get at your iBook's RAM slot. Even if you don't want to change the RAM, you'll want to remove the RAM covering so you can later more easily access the hard drive. Next you'll want to take out the screw in the upper left as well as the two to the left of the AirPort slot, and the one to its lower right. There are also two screws in a groove. Remove those to get at your iBook's RAM slot. Even if you don't want to change the RAM, you'll want to remove the RAM covering so you can later more easily access the hard drive.
A seventh screw is hidden under the little magnet that holds down the middle of the keyboard. To remove the magnet, simply place the flat end of the regular screwdriver on it and it'll come out. Then you can pull out the screw with the Phillips screwdriver. While you're there, you will also want to detach the keyboard and track pad cables. You simply pull on the two flat bars at the top, and it'll slide up a little, releasing the clamp that holds in the flat cable, and you can pull each one out. The keyboard cable may be glued to the surface, so carefully pull it off. After that, it's time to turn the iBook around again and continue with the bottom.
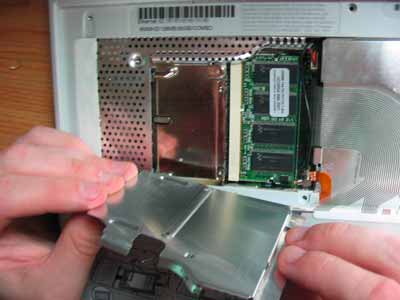 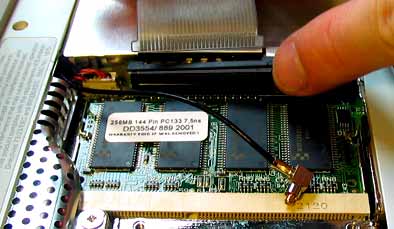
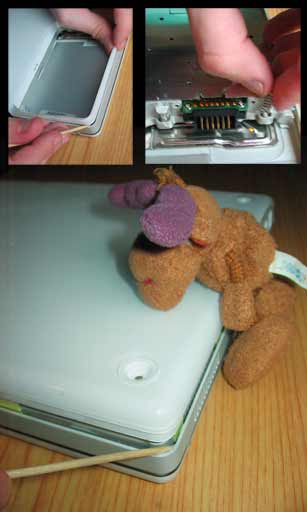 This part is a little tricky. You see, now that we've removed all screws that hold the covers on, we need to open up the iBook's two "shells". These shells, however, are clipped together. What you now have to do is take the Shish Kebab stick and stick it in between the two halves, trying to make the little latches unhook. If you value your iBook's shell, you do this carefully. It's very easy to break the plastic, and since the bottom cover is made of plexiglass, it's very easy to chip or break it. Be especially careful where the air vent outlets are. The top of that plastic is very thin and breaks easily under stress. This part is a little tricky. You see, now that we've removed all screws that hold the covers on, we need to open up the iBook's two "shells". These shells, however, are clipped together. What you now have to do is take the Shish Kebab stick and stick it in between the two halves, trying to make the little latches unhook. If you value your iBook's shell, you do this carefully. It's very easy to break the plastic, and since the bottom cover is made of plexiglass, it's very easy to chip or break it. Be especially careful where the air vent outlets are. The top of that plastic is very thin and breaks easily under stress.
It is not necessary that the Shish Kebab stick be very strong. In fact, it is expected that it'll break a couple of times and you may have to cut it off when it breaks into too jagged a shape. But that's good: When the stick breaks, that indicates that you're using too much force. if you used your screwdriver for this, you'd get scratches into the iBook's casing, or could even do worse damage. The stick is not there for leverage, but rather just as a tool for getting between the halves and unhooking the latches. Be patient, this is the longest individual task of the whole operation.
Be wary when you actually take off the bottom cover. There are two small springs in the battery compartment that push out the battery when you unlock it. These springs can easily fall out, and you wouldn't want to lose them.
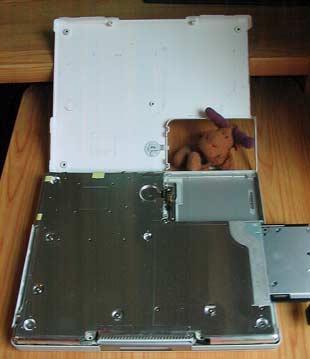
Now you should be looking at the bottom shielding. There are five Phillips screws you need to pull. Two on the left, two at the bottom, and one at the very corner of the battery compartment. Once you've done that, carefully loosen the pieces of tape (in my case yellow) and the pieces of adhesive tin foil (especially at the bottom and the corners). You'll later want to re-attach them, so try not to tear anything. You should be able to fairly easily lift out the shielding.
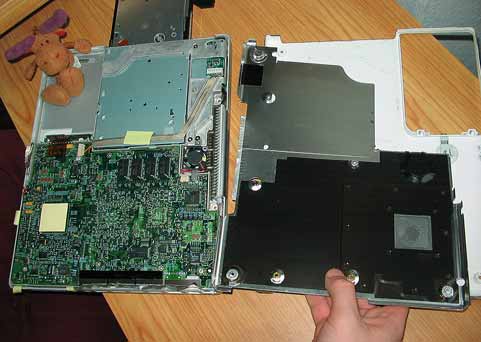 Finally, you're at the heart of your computer, the main board. That yellow-insulated thing is your G3 CPU, I think. The thing here is that your hard disk is exactly on the opposite side of the main board, but due to the sandwich-style build of the iBook, you had to remove all this junk to get at the four (!) final screws that hold together the top bun and the central meat patty, so to say. Finally, you're at the heart of your computer, the main board. That yellow-insulated thing is your G3 CPU, I think. The thing here is that your hard disk is exactly on the opposite side of the main board, but due to the sandwich-style build of the iBook, you had to remove all this junk to get at the four (!) final screws that hold together the top bun and the central meat patty, so to say.
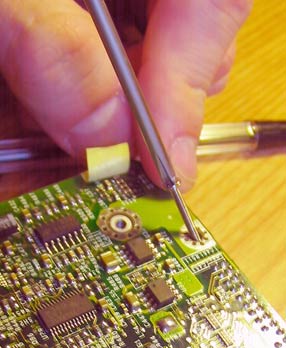
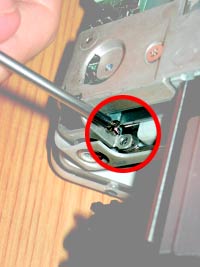 Basically, the main board is enclosed by a frame on the four thinner sides, and the top and bottom are screwed and clipped to that to cover the two open sides. The first screw is very easily accessed. It's in the CD drive bay, just next to the power plug. A second screw is on the opposite end of the CD bay. That's why we opened the CD tray right at the start. So, pull out these two Phillips screws. The third one is clearly visible in the upper left of the main board, diagonally across from the fan. It's a rather long screw and reaches all the way over to the other side. The fourth one is right next to the lid's closing mechanism. It's affixed to a black plastic thing that turns out to be that pulsating light that shows you when your Mac's in energy saver mode. Basically, the main board is enclosed by a frame on the four thinner sides, and the top and bottom are screwed and clipped to that to cover the two open sides. The first screw is very easily accessed. It's in the CD drive bay, just next to the power plug. A second screw is on the opposite end of the CD bay. That's why we opened the CD tray right at the start. So, pull out these two Phillips screws. The third one is clearly visible in the upper left of the main board, diagonally across from the fan. It's a rather long screw and reaches all the way over to the other side. The fourth one is right next to the lid's closing mechanism. It's affixed to a black plastic thing that turns out to be that pulsating light that shows you when your Mac's in energy saver mode.
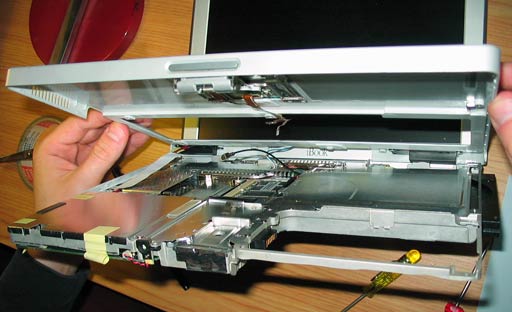 Removing the top is similarly fiddly as with the bottom, but since you now have one half open, you actually see what you're doing. One thing to watch out for is the power plug. It sticks out into the hole in one corner, and you basically have to unhook the three others and then carefully slide it off (It only gets really fiddly once you want to get it back in ... have fun!). Removing the top is similarly fiddly as with the bottom, but since you now have one half open, you actually see what you're doing. One thing to watch out for is the power plug. It sticks out into the hole in one corner, and you basically have to unhook the three others and then carefully slide it off (It only gets really fiddly once you want to get it back in ... have fun!).
The wires for the power switch and the two speakers attached to the top of the casing (upper-left, near the keyboard's area) are also taped onto the top shield of the main board. So, once you have the top loose, get back to the keyboard/RAM area and loosen the taped-on wires so you have some room to maneuver. Once the top is off, you can see the hard disk in the lower left, just under the arm rest and next to the trackpad.
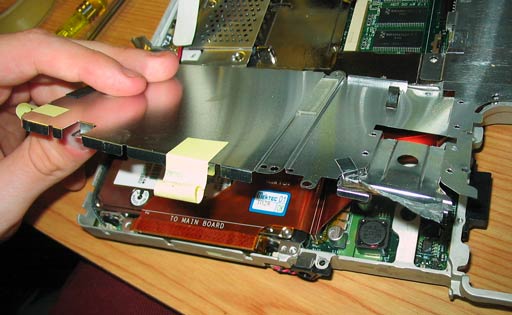
Loosen the other ends of the pieces of tape and the 8 screws holding down the lower half of the shield. Carefully pull up the metal shield (don't bend it too strongly or it could break or stay bent at an angle permanently) and below it you'll see the hard disk. Now it gets easy: You've already loosened all the screws that hold down the hard disk. So, first, pull up the plug at the longer side of the hard disk whose cable covers the lower right corner ("TO MAIN BOARD" is written on it). The device is attached to two "sled blades" at its longer sides. All you have to do is lift it up (to take it off a few pins holding the blades in place), take it out, and pull off the plug at the end of the disk. The blades can be pulled off easily.
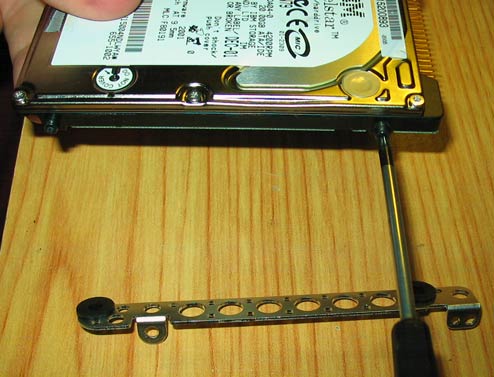
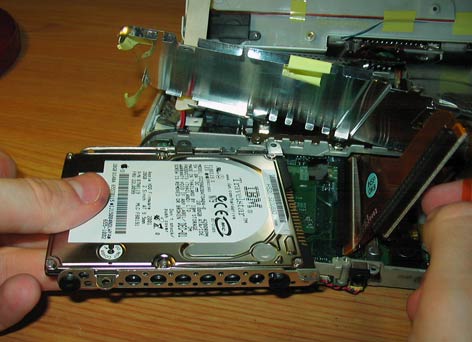 If you compare your new hard disk and the old one, you'll notice that the old one has four little nubs coming out its sides where the new one has screw-holes. This is where the Torx screwdriver comes in. Use it to screw out the nubs and screw them into the new disk, and you can easily re-attach the blades, plug the disk back in and put it back in its hole. If you compare your new hard disk and the old one, you'll notice that the old one has four little nubs coming out its sides where the new one has screw-holes. This is where the Torx screwdriver comes in. Use it to screw out the nubs and screw them into the new disk, and you can easily re-attach the blades, plug the disk back in and put it back in its hole.
Once the disk is in there, you basically just have to do the reverse of these instructions, so I won't bother to describe how that is achieved. Just make sure you don't forget to re-attach keyboard and trackpad, or you'll have to do this all over again. Suffice to say that, while the actual disassembly took about the time of a single episode of Lord of the Rings, assembly went noticeably faster. You simply take one screw after the other off the cheat sheet and screw them back in. Below is a picture of my cheat sheet after I'd pulled the last screw:
Once I had the machine closed again, I was finally back in more familiar territory: Software. When you boot up the iBook after this repair, the new hard disk is obviously not yet formatted ("initialized"). You'll get that odd system folder icon with a blinking question mark. So, fetch your MacOS X CD or DVD, and hold down the mouse button at startup. This will cause the CD drive to open and you can insert the system CD.
Once the Installer comes up, you won't be able to install. It won't recognize the unformatted disk. So, open up the "Installer" menu and pick the "Disk Utility..." menu item (on post-10.3 systems, this may be in a dedicated "Utilities" menu). You'll get good old disk utility, and your hard disk should show up with a name like sda1 or so. Select it and switch to the "Erase" tab, then enter a name for your disk and initialize it. Once that is finished, quit Disk Utility to get back to the installer. Installer may now claim that you couldn't boot off this volume. If that's the case, choose "Restart" fom the Apple menu and it should work the next time. Have fun installing your system.
If, like me, you have a 10.3 CD and a 10.4 upgrade CD, you'll have to install 10.3 first or 10.4 will refuse to install. However, 10.4 will replace all of 10.3, so there's no need to download all the software updates you're offered when booting into 10.3. Just do a custom install and turn everything off you can. Also, if you want to save some more time, go through this installation in English, then you can also uncheck all localisations.
You know, that was actually kinda fun ...
PS - Standard disclaimer for taking apart stuff applies: If you break it, you get to keep both parts. I don't have to tell you about voiding your warranty because it's unlikely anyone still has warranty on a Pearl White iBook these days...
PPS - Thanks to my sister Ruth for Photography and strategic Moose placement.
Update: Took apart another iBook for the same operation. During that, I found out the other 'book had been missing a screw, so I added that.
 tom writes: tom writes:
hey, thanks so much for documenting this. i just replaced a friend's hard drive and it went without a hitch.
|
 Ed Kemp writes: Ed Kemp writes:
Many thanks for the informative article. The pics are a great help along with your easy to follow narrative.
I pitied my old ibook sitting on the desk becoming a coffee stand whilst I used the wonderful Asus.
Took it apart and fixed power, sstart up and screen problems.
I like the compact, on the knee, comfortable keyboard and decent battery power of the ibook.
It is like having an old friend back.
Cheers,
Ed
|
 asian cajun writes: asian cajun writes:
Great job! Nice to have pics of a real system to see everything. BTW, the "yellow-insulated thingy" is actually the video chip, and it's the bugger that has been responsible for so many logic board failures in the the dual USB iBooks (12" and 14" models), and in the even newer models as well. The G3 processor is actually on the top of the logic board and underneath the metal heat sink that is located where the airport card sits. To see how to do more repairs, such as logic board replacements or display replacements, I suggest checking out www.pbfixit.com.
|
 Jim writes: Jim writes:
Very helpful! With your nice instructions, I have just finished uprading my ibook G3 with a new hard drive, slot loading DVR drive, and fixe the reed switch cord. I now have an ibook that should last me another three years. Thanks!
|
 jomo writes: jomo writes:
This would have been pretty scary all by myself, but with the moose there I felt quite safe. So thanks! I used this writeup to do a switchout of a DC-in board, actually, but the disassembly was all the same right up to the end.
|
 John writes: John writes:
Holy Mackerel that was a pain! There was a zillion screws to keep track of, plus a number of them were different sizes, plus cracking that shell apart was very difficult.
With the Dell laptops, there's just one screw and you pull the drive from the side of the unit. The hard disk is usually the first thing to go on a laptop. Obviously, Apple makes plenty of money on folks bringing in their computers to have their hard disks replaced (rather than fixing them at home, or having a handy friend do it).
BTW, placement of that screw beneath the small magnet was diabolical.
|
 Yon writes: Yon writes:
Hey Great how-to. Thank you. I am planning on getting a bad ibook, replacing the logicboard and putting ubuntu on it. Your how-to is clearer/simplier than the official apple manual. Thanks again and thanks to asian cajun for the pbfixit url.
|
 Obi writes: Obi writes:
right now i did the same job that jomo did withj the DC-IN board. it flawlessly worked. thanks
|
 MidnightToker writes: MidnightToker writes:
dude, you're a life saver. -well, you made me think.
HDD just died in a friends G3 Dual USB iBook. Not a problem I said, and bought him a new disk from Ebuyer.
I followed the apple hardware guide for taking apart the laptop (one of the bonus's of formerlly working for an Apple Repair Center, tonnes of documentation) and realised that actually, it was a bit of a problem.
The takeapart took a couple of hours, its fiddley, time consuming and scary, but it happened, and the iBook has sat in my desk draw for a week or so, untill the hard drive arrived (just now, 40GB Toshiba), so I plugged it in with the keyboard resting on top and booted back into DiskWarrior to check the new drive was seen and happy.
No hard disk showing. Booted into Drve Genious instead. Still no disk showing. I head outside, have a coffee and try and stop panicking that the new drive isn't Mac Compatible, and my friends iBook is scattered in pieces accross the desk.
Long panic short, it turns out that Disk Utility see's it fine even if DiskWarrior and Drive Genious dont. Panick over, and time to try putting hte thing back together -except I'm going to follow your instructions rather than the apple ones.
-Nicely documented, generally nice website ;) -thanks.
|
 Henk-Jan writes: Henk-Jan writes:
nicely done, missing the odd picture here and there, now sort of stuck trying to get the top lid off, unsure if I have all the proper screws out :(
|
 Reaper The Grim writes: Reaper The Grim writes:
Wow this is amazing, I just bought a DVD/CDRW for my iBook and was trying to find a way to install it in the ibook, This is the closest I was able to find to helping me install my Drive
|
 acsmooth writes: acsmooth writes:
Thanks for the nice explaination. It took me 2 hours to get it done.
|
 T.B.Hansen writes: T.B.Hansen writes:
I followed the instructions, shut the case, and - neither the new disk or the CD drive works. I can start the iBook is from an external disk, but neither DiskUtility nor DiskWarrior can see the HD or CD drive.
|
 Uli Kusterer writes: Uli Kusterer writes:
Make sure you set the jumpers correctly on the disk. IIRC you need it as "master". Some shops sell hard disks jumpered as "slave". I'm not sure, but the CD drive may be the slave to the hard disk, so if you jumper both as slaves, that would explain why you see neither. Either that, or you pulled out a cable (maybe by accident) and didn't put it back in again before assembly. I'm just assuming you bought the correct kind of hard disk. Some computers have a size limit and can't make use of some of the larger disks (above 120 GB, I think), so I hope you didn't fall for that.
|
 bz writes: bz writes:
Uli, you're genius! Many thanks for your step-by-step and for making it idiot-proof. I'm certainly no geek but thanks to you I was able to install a new drive and get my iBook back in the saddle! You rock, Dood.
|
 leo writes: leo writes:
Uli - Many thanks for doing this excellent documentation for dissecting the ibook! In the process of taking apart my brother's ibook to harvest the hard disk and all the data as the logic board's konked and it appears that i won't be able to get the logic board fixed/replaced anymore! Your generous sharing of the dissection process is going to save me a ton of time! Thanks again on behalf of all us do-it-yourselfers..!!!
|
 roel & jan writes: roel & jan writes:
thanx man!
you guided us very well through the whole procedure, great work! And also very much thanx to your sister for the photos and of course the raindeer for its brilliant performance!
Greetings from Amsterdam
|
 trina writes: trina writes:
HI,
I have an ibook g4, but my latch is broken there for my lid doesn't shut completely. I was wondering how can I fix that problem. Does it mean that I have to replace the top lid, or the bottom cover where the mouse is. When I close it I can see the metal latch on top point down, but it wont connect to the bottom laptop. Thank you for reading this letter.
Sincerely,
Trina
|
 dustin writes: dustin writes:
Just remeber when you do this, take out all of your ram and airport cards. Im not sure if it was mentioned in the article or not, but I took the entire thing apart twice to figure that one out. Good luck!
|
 Vini from UK writes: Vini from UK writes:
thanks, i havent got my ibook yet im only 14 but im very very good with computers, well pc's anyway and i have never taken apart a mac but soon to be ! :)
|
 Lee writes: Lee writes:
Good instructions! Can you tell me how far I have to go with the procedure to get at the closing mechanism, probably on both case and cover. Mine doesn't stay closed, and I'd like to try to fix it.
|
 Dom writes: Dom writes:
Uli
Fantastic job. looking forward to changing hard drive instead of worrying about it. One question, my mates g3 ibook 500 is getting a white screen every now and then, after you close the the lid and re-open it, it seems to right itself. Do you know if this is a common problem?
Cheers
|
 Uli Kusterer writes: Uli Kusterer writes:
@dustin: AirPort is mentioned and there's even a photo. Taking out the RAM really isn't necessary, at least for the Pearl White iBook about which this article is. Obviously, YMMV for any other models.
@Vini: Getting a used iBook? If you ordered a MacBook or so, keep in mind that that's a completely different machine that will look very different from this one. Also remember that this voids your warranty. If you still have warranty, I recommend just sending it to Apple for repairs and waiting to find out how the inside looks.
@Lee: The hook for the closing mechanism is in the lid (i.e. where the screen is). I'm not describing that here, but it's fairly easy to open if you have an allen wrench that exactly fits. If it even slightly doesn't fit, you'll slip and damage the screws, which can make it impossible to open, so be careful there. For the latch it hooks into, you need to go far enough to take off the bottom cover, then it should be visible as a small spring at the top, next to the sleep light.
@Dom: Haven't heard about that one. I've heard about odd stuff on the display if the logic board was a goner, and a white display means all pixels are off (i.e. cleared), so my guess would be it could also be a broken cable in the hinge, but you'd rather ask someone who has hardware knowledge about that.
|
 Mark writes: Mark writes:
Greetings,
I have an iBook that will not power up. I took it apart and found that there is a small battery soldered to the main board, looks like it has leaked, I was wondering if there is a listing of replacement of this battery? What to look for if the battey leaks on the main board? It looks like it must of been running hot because the plastic covering has dried out.
Thanks in advance,
Mark
|
 Dave Chugg writes: Dave Chugg writes:
Nice description.
Good idea if possible to actually test out the new HD before changing. Get a 2.5 inch firewire enclosure, connect your new drive and use the free and excellent Carbon Copy Cloner program to clone your old HD to the new one. Then set the Firewire connected disk as your new start up disk. Run it like that for a couple of weeks to make sure your new HD is good and reliable. Then do the swap over.....
All this assumes of course your old HD was still working okay and you just wanted to go bigger.
|
 ferretmom writes: ferretmom writes:
Wow! Great explanations and photos! Enough to convince me to put my keyboard back on, bake some goodies and do some major kissing up to a friend!!!
You just saved me hours of frustration and severe damage to my old iBook! Thanks :)
|
 brad writes: brad writes:
Hi.
Wondering if you saw any airport antennae near the hinge. My iBook 800MHz G3 is suffering from dredful wirelesss range. My gut tells me there's a short around the hinge�and it does work intermittently when I push around there, as well as swing the display at different angle.
Suggestions?
|
 Uli Kusterer replies: ★ Uli Kusterer replies: ★
@brad: I don't know where the antenna goes through the hinge, but I think it's basically one of the long wires that go around the display in the top shell. If you make sure you don't mix it up with the microphone's wire, I think it should be easy to spot. Hope that helps you find a fix. If you do, be sure to let me know.
|
 Thomas regny writes: Thomas regny writes:
HELP ! I have a ibook G4 933mhz and I can't unlock the CD tray as shown. Is there an other way?
|
 Uli Kusterer replies: ★ Uli Kusterer replies: ★
@Thomas: I don't think the G4s even have a tray... aren't they all slot-loading? So there's nothing to unlock there, as far as I know. But as I only have a pearl-white, I can't help you :-( If you're simply looking to get a CD out of the drive, you could try starting up and holding down the mouse button a couple minutes, that will usually eject a CD.
|
 George Kennedy writes: George Kennedy writes:
Thank you, Uli, You are a friend to every willing but inept Mac lover - it's a masterful guide and obviously a labor of love.
My G3 iBook 14" (female) AC slot has the (male) AC cord's 'projecting tip' stuck inside the hole. (I didn't ask my grandson how he managed to break it off)). Is there any way to get it out, or bypass the slot with AC, or replace the switch? Old or not, it's just too good a machine to discard. The way it is now, I can't even charge the battery. Thanks again for being a MAC hero.
|
 Uli Kusterer replies: ★ Uli Kusterer replies: ★
George,
I can't really help you with that, as I don't own such an iBook model. If its power plug is anything like mine, I don't think you can just replace it, as it looks suspiciously like a proprietary plug.
If you're adventurous you could try to get a same size plug that looks like the centerpiece and somehow replace the broken centerpiece with that (no idea whether that's even possible) or lop off the plug from the power supply and replace both the plug and the outlet for it with another plug...
But really, I wouldn't know how to do that, and I doubt the outlet is that easy to remove... You'd definitely need to be handy with a soldering iron. You might be able to extract the plug with a pair of pliers and buy a new power supply. That would at least be cheaper than having some Apple guy remove the whole outlet from the main board (because the latter would require opening the Mac). Might even be possible to get Apple to put a new plug on the power supply, but I have no idea whether that'd be cheaper than buying a new one. ... repairs and power supplies both aren't cheap.
BTW -- I removed your e-mail address that you posted into the message. *never* put plainly readable e-mail addresses on the web site -- spammers send their junk to everything that contains an "@"-sign that they can find on the web.
|
 Uli Kusterer replies: ★ Uli Kusterer replies: ★
George, worst comes to worst, you could carefully try using contact glue or so to and a shishkebab stick to glue the plug tip onto something that you can hold and use to pull it out... though of course you can make things worse by glueing the broken plug *into* the outlet if you get it wrong :-S
|
 Alex in the UK writes: Alex in the UK writes:
Uli - man - you are a legend.....
i managed to get the HD out and put in another shell so i can recover LOTS of lost stuff.... quick question though.... if a file was stored on the desktop - is there any way to recover that?? I had a load of college work in a file on the desktop... is this gone?
i have been taught a lesson about backing files up this time!!
thanks again
|
 Uli Kusterer replies: ★ Uli Kusterer replies: ★
The desktop is just a folder in your home folder. All your files should be in there. If your username is "ahunter", then the files will probably be in /Users/ahunter/Desktop/.
|
 60 writes: 60 writes:
thank you so much for being with me when replacing my good old g3-ibooks harddisk, wonderful description, helped me a lot
yours, 60
|
 Mike writes: Mike writes:
That is an AWESOME break down, I am going to be getting a used iBook 500 in good condition for $150.00, I was just wondering if I can get my hands on 600 or 700 logic board, will it just drop in place of the 500 board? Thanks for the great pics. Can you send me an email to let me know. THX
|
 Uli Kusterer replies: ★ Uli Kusterer replies: ★
@Joe: I'm not 100% sure. Check out Apple System Profiler to find out what kind of hard disk is in your Mac, and try to get one like that. I think 4400 rpm seems a little slow though... make sure your access times and rotations-per-minute aren't lower as what you have built in. The hard disk is one of the main bottlenecks if you don't have oodles of RAM installed. BTW, a nice place to find out about the specs of your Mac is http://www.apple-history.com
|
 Diamond writes: Diamond writes:
You are a life saver! Perfect instructions!A big thumbs down to Apple for putting the first part to fail in notebooks in the most difficult place to get to!
|
 Charles Wolfman writes: Charles Wolfman writes:
Great job on this article Uli, very informative and helpful.
This will be very helpful when I get my iBook, I need to switch out the drives cause my mom wants my old Powerbook G3, but I want to keep my stuff.
Great work!!
|
 Uli Kusterer replies: ★ Uli Kusterer replies: ★
@Charles: An easier solution to that would probably be to hook up your two Macs with an Ethernet cable or using target disk mode and use CarbonCopyCloner or so to copy over your files. I wouldn't take apart a pefectly working iBook just to transfer a few files.
|
 Mike writes: Mike writes:
I found that I can change the logic board from the old 500 to anything up to the 900, you ( I ) need to change the rib frame, the modem, the heat sink and fan. That's it. Now I just need to save up and get the parts. Shouldnt cost more than $200 to change to a 600/700 and not more than $350 to go 800/900. (I could just get another used book, but wheres the fun in that).
|
 ron writes: ron writes:
i like what you have showed me so far,but is there any way that i can eject
the battery without taking my apple laptop apart.it has no power at all
|
 Per-Kristian writes: Per-Kristian writes:
Thank you for your help. I have been spending the last to hours replacing the harddisk in my iBook G3, and it works perfect! Because of you!!!
|
 Uli Kusterer replies: ★ Uli Kusterer replies: ★
@ron: Why would you need power to eject the battery? Just use a coin to turn the "lock screw" by 90 degrees, and the battery should pretty much just jump out at you. If my description isn't clear, refer to the handbook. It has drawings that show how to eject the battery.
|
 kajgod writes: kajgod writes:
I got an old broken Ibook just like the one you worked on, and it works fine if the battery is charged on another computer, but it will not work if you plug it in the wall.
What I want to do (since I don't care for it's mobility) is somehow bypass the battery and connect the power from the adapter directly where battery used to be... Is that possible? If not, any other way to do the trick? The service wants to charge me 200 euro, but I'd prefer to play around with it myself, just for the fun of it...
|
 Wes writes: Wes writes:
THANK YOU!
I went through this nightmare when my hard drive died and these instructions got me through it. These instructions worked just as well for a slot-load iBook G4 (800 mhz).
I should point out the pitfall I found- there is another, larger magnet glued to the underside of the top (acrylic), just below the >/End key. Mine came unglued and when I found it, I couldn't figure out where it went anymore. That magnet is used so the machine knows when the lid is closed. To prove this to yourself, slide a magnet down the right edge of the display, and the machine will go to sleep.
Once I realized what the magnet was for and what part of the screen had the magic sensor, I found a spot on the acrylic where the magnet was supposed to go, and all is good since then.
I used a Seagate 7200 RPM 100 Gb hard drive and haven't found the noise to be excessive like some warned. It's no louder than the original Toshiba 30Gb. It is a little warmer, but still OK. I don't see much difference in battery life, either, but I don't use the battery much.
|
 Alex writes: Alex writes:
-Tears welling up in eyes, then hugs the writer- I'm Apple Certified in laptop hardware, and I must say this is one of the BEST tutorials that I have seen for this... Other than the Apple ones. Only one thing I caught though, that little magnet that you say is to hold the keyboard down is actually the Sleep when closed, that magnet is the reason the computer is triggered to go to sleep, but other than that GOOD JOB. I would recommend you to get Certified definately.
|
 Uli Kusterer replies: ★ Uli Kusterer replies: ★
@Alex: I think you're mixing up the iBook G4 or the MacBook with the G3. To make the iBook G3 go to sleep, I can simply pull out the hook at the top of the screen (the one that keeps it closed). So, for this old model it's easy to prove that no magnets are involved, or at least not this magnet.
|
 Jonathan writes: Jonathan writes:
Instead of Shish Kabob stick, I used old credit cards (or a plastic discount cards). I had 6 of them and inserted in all sides. Lot easier and won't damage or scratch the surface.
|
 Levente writes: Levente writes:
Thanks a bunch! I used your awesome step-by-step instructions to diagnose the problems on my friend's iBook. Thank you for all the meticulous detail you put into this article.
|
 Megan writes: Megan writes:
Excellant work, Uli! This was very informative. I have everything assembled except the keyboard (due to a move I cannot find it) and it wont power up. The hard-drive spins up and down real quick but that's it. I thought I read somewhere that the iBook wont turn on if the keyboard isn't inserted. I'm hoping that is the case, for I am one step away from resurrecting this baby from the dead. Anyway, thank you so much for this.
|
 LninYo writes: LninYo writes:
good work! i used your instructions to fix my g3 ibook. I used another site (faqintosh ) to fix my g4 newer ibook and guess what, the power connector on those things is awefully fragile. I pulled on it and the whole assembly came up!!!!!
BE VERY VERY VERY C.A.R.E.F.U.L !!!!!
Now, does anyone know how I can close this thing back up? i was able to boot it by shorting the two points which I guessed were the contact points.. if I just solder those two points there permanently, would that just boot the machine every time I hooked up the power cord? the battery and the charging don't seem to be affected by this.
|
 bla bla writes: bla bla writes:
yea, if you need to any kind of fixing job, or replacement, or upgrade, go to: ifixit.com, and click on guides. it tells you everything! and the recommended tools! very handy
|
 robert writes: robert writes:
thank you very much, i had to replace my upper case latch on my ibook. with you steps it was very easy. now if i ever need to do other work i will go with your instructions.
an authorized apple repair place wanted 80 dollars for the part and 75 dollars an hour for labor (min 1.5-2 hrs)to install this. with your steps i did it in less than 2 hrs and bought the latch on e-bay for less than 20 with shipping.
thanks a bunch and <bows> to the moose god.
have a great day.
nightscape
|
 David Nilsson writes: David Nilsson writes:
Great info!
I will try to fix my iBook G4 this week when I've bought the tools etc.
If Icant fix the computer I will try to make something out of the screen and other parts that still is working.
I think "only" the motherboardi broken...
|
 Robert P writes: Robert P writes:
A lot of howtos, including this one, say that you need a 2mm hex key to take out the screws on the bottom, but on the ibook I'm trying to fix the screws are larger than 2mm. Unfortunately they are also smaller than 2.5mm, which means that standard metric allen keys won't do the job. It looks like Apple used different screw sizes for different batches of pearl G3 ibooks.
I'm suspect that the hex screws are either 3/32 inches or 7/64 inches. Does anybody else know what exact size the weird size screws are?
|
 Uli Kusterer replies: ★ Uli Kusterer replies: ★
@Robert: Yes, the Allen screws are a very odd size, especially the one on the display. I had to go to a friend who's an office equipment repairman and borrow one of his wrenches because mine didn't quite fit. If the screws are pristine, you can usually use metric wrenches anyway, except if they were very firmly screwed. Otherwise, or if they were damaged, you'll definitely need the right wrenches, or you'll just destroy the hex-hole and make it impossible to get them out.
|
 Lex writes: Lex writes:
A note: there is no need to remove the aluminium shield at the bottom, at least not with my iBook (G3 800MHz). This saves you from having to peel off some of that nasty tape. It may be necessary to remove the 5 screws that are in the shield, but the two screws under it only seem to fix the motherboard to the magnesium frame. Because there appear to be differences between different revisions of the iBook, it may be possible that on your particular model the screws under the shield go all the way to the upper cover. I'd say: try to take off the upper shell without removing these screws, if it doesn't seem to work, remove them.
I just placed the original HD back in my iBook to sell it (I'm keeping the custom 80GB HD for an external enclosure), but I have taken it apart about 5 times before. Doing it multiple times doesn't help to make it less annoying, because I swear this was the last time I ever disassembled an iBook. I'd rather poke myself with a hot soldering iron than going through that hell again!
|
 Uli Kusterer replies: ★ Uli Kusterer replies: ★
@Lex: Yeah, the ages-old rule from the 80ies applies: Never eat in front of your computer. No matter whether it's on, off, or disassembled :-) ... okay, I admit I managed to pour soup on my keyboard once, but it's water-proof, so I get away with it.
|
 melanie writes: melanie writes:
I wish I had found your tutorial before I followed ifixit's for replacing the hd on an ibook g3 900mghz. You bypass removing the power cable from the logic board. Unfortunately, I pulled the socket off the board despite their warning. I don't feel too bad since I still couldn't pull the connector out of the socket. What is the best way to attach the socket back? Solder or some type of glue?
|
 Justin From Saint Louis, USA writes: Justin From Saint Louis, USA writes:
They really don't make these little bastards easy to get into do they? Actually, without your instructions I would have been lost and for that I thank you! Happy Mac'ing !!
|
 TonyG writes: TonyG writes:
Phew, thanks. Swapping HD from friend's G3 with fried mainboard wouldn't have been possible without your advice. I used to think that my Mac repair place was padding their hours, now I see I was being unfair to them. Extra special thanks for the tip on that magnet over the screw head.
|
 Jon Simpson writes: Jon Simpson writes:
Many many thanks for this article. Saved me either having to bin my iBook or pay an Apple service centre an outrageous amount of money. And to anyone else who reads this, unless you have a perfect photographic memory, remember to make a map of where all the screws go.
|
 Sam writes: Sam writes:
I just replaced the screen and it worked when I had it all disassembled (before putting it back together). Now that it's put together, the screen won't turn on. Can this be related to the magnet issue?
I have the 12" iBook.
|
 Mr C writes: Mr C writes:
Sam, Probably not a magnet issue. More likely a damaged wire in the wires that run through the hinge to the scree.
My 12" dual USB iBook just developed a backlight problem the same day I brought home a newer iBook G4 (I thought it must have been jealous). The backlight would switch off when the lid was tilted past 90 degrees open. I'd disassembled it before to put a bigger hard drive in it, so taking it apart again was not big drama, though I hadn't taken the screen off and disassembled it the first time. There were 2 loose screws in the screen assembly! Loose as in not in the holes they were supposed to be in, loose in the screen casing, and I had never taken it apart before! Anyway that wasn't the problem.
Over time the wires that run through the hinge get squashed and worn every time you open and close the lid. The Black wire in my iBook was only held together with a shred of the insulation, and snapped completely when handling it. Moving the lid past 90 degrees must have open circuited the circuit, making the light shut off.
I cut the wire off 1 inch from each connector, and spliced in a new wire to fix the problem.
Now thats fixed I have to pull apart the G4 to put a hard drive in it (bought it cheap at auction without one).
|
 KatHay writes: KatHay writes:
Wonderful reference site. I work in Educational IT with email OS side. I get into pulling apart a computer when necessary but really get rusty from lack of practice and knowledge...thanks for the info! I know this isn't a discussion forum, but if anyone is out there with some advice...I have an ibook ppc g3 500mhz 67 mhz bus speed 256 L2cache board with 256 m of ram dated 2001 running 10.2.8. I picked up a cheap ibook 2002 700 mhz 100mhz bus 640 mb ram 512 L2 cache g3ppc running 10.2 that the school was going to surplus. However the track pad doesn't seem to work on the 700. Hard drives are the same except for subtleties in the OS and my info is on my old one. Is there enough difference in the 700mhz board that I should try to move it to my other machine or will grabbing the memory and replacing the keyboard be my best bet (oh and yeah, my 3year old molested the keyboard on my 2001 so that I use a usb keyboard). Anyone...anyone?
|
 ing.conti writes: ing.conti writes:
very useful!
Apple engineers are VERY crazy! At the of the disassembly I have hundreds of screws!!
what a hell!
I look with respect to Macpro Engineers: NO screw, no tool!
|
 julie writes: julie writes:
I've disassembled my ibook (as the logic board is fried), and removed the combo drive (cd/dvd). Can I convert it to an external cd/dvd drive? If so, can you tell me how do I go about it?
This is my first time disassembling it, and it was successful (altho many hours)
|
Uli Kusterer replies: ★
You'll have to buy an enclosure that is the right size (they usually come in inch-diameter sizes like 5.25, 3.5 or 2.5, though I think CD drives are always 5.25, and then there's the height which is also important). If this is a tray-loading drive like on my iBook G3, you'll probably not have much luck. Not sure about the slot-loading ones, but your chances may be better. Enclosures usually include a power supply and a "controller" chip making it either FireWire (IEEE 1394) or USB. I know that sounds easier than it is, but I guess you'd best find out what enclosures are on offer, and compare their specs to your drive. Can't say more than that.
Hard disk would be easy to re-use. Not so sure about notebook CD drives.
|
 Kevin writes: Kevin writes:
Excellent article...Thanks for the time spent categorizing it. Made my job so much easier.
Kevin
|
 MAUTESI writes: MAUTESI writes:
Parab�ns
Gostei muito da sua p�gina pois tinha vontade conhecer o cora��o do ibook. Me ajudou muito.
obrigado
Mautesi
[Congratulations
I liked your page very much because I always wanted to know the heart of the iBook. It helped me a lot.
Thanks,
Mautesi]
|
 Gus Dalling writes: Gus Dalling writes:
Great article, I have taken apart my ibook 600 replaced hdd with a larger 40gb one (after testing by installing the os to it in a firewire case. put back together, and now my trackpad and keyboard are non-functional, (before you say he obvious, yes the trackpad and keyboard are plugged into the logic board. any Idea where to start looking for any connections I could have pulled out?) I currently use my ibook with external usb mouse and keyboard, nice but slightly less portable than it once was.
|
 Uli Kusterer replies: ★ Uli Kusterer replies: ★
@Gus: Well, if you've checked the connections (twice?), and that you inserted the wires at the same depth they were at before, and didn't break any wires, have you tried restarting? I had it once that the trackpad kind of went dead, then I turned off and back on, and then it suddenly started working. However, if it's the keyboard, too, that sounds a little odd.
Otherwise, you may have been statically charged and fried the ADB chip, whichever one that is.
|
 Darlene writes: Darlene writes:
I have a G4 ibook and the dreaded blue screen problem. I took it to the apple store and they said it was either a hardware problem or software problem. They think it's a hardware problem. Would replacing a hard drive fix this?
The computer isn't recognizing the wireless card.
I can log on after I hold the shift key down.
|
 Matt writes: Matt writes:
Thanks to your guide, I was able to pull 50 cents in change (2x 20c + 1x 10c coin) from the CD-ROM drive of my wife's G4. My 2.5 year old daughter especially likes the money slot on the side of the G4. :-))
Hey I have some photos of the CD-ROM drive being pulled out if you need them.
Cheers!
Matt.
|
 Uli Kusterer replies: ★ Uli Kusterer replies: ★
@Darlene: Did you have any Application enhancer extensions installed? APE also comes as part of some programs (Logitech uses it as part of their mouse driver, don't ask me why). If you just upgraded to Leopard, then you're running into a known incompatibility between older versions of APE and Leopard.
@Matt: Heh ... I guess it's time you get her a Fischertechnik construction kit so she can build her own vending machine... although 2.5 may be a tad early for that. Maybe just sawing a slot into one Lego brick may be a good alternative?
And sure, I'd love to have a look at the photos. If they fit the page, I'd love to include them.
|
 Paul & Reema writes: Paul & Reema writes:
Fabulous directions - especially the part about the scotch tape and paper. I've been taking things apart for years and wish I had thought of that a long time ago.
Best,
P&R
|
 vau & tschama writes: vau & tschama writes:
THX!
we just replaced the hdd, now we have an excellent coffee machine
-works brilliant, fine coffee!!!
I think we made an mistake between the steps 2 to 7!
:0)
Thanks so long!
I fully agree with the comment of Aaron! ;o)
|
 Mate writes: Mate writes:
Hi Uli,
Thanks for your informative website. It helped me lots while disassemblying my Ibook. I had problem with my screen. (it was black, and sometimes half black/grey or purple/green/black, but mostly plain black. I bought a used ibook screen and I changed it but it is still black. I can hear hard drive running, keyboard is functional, sound theme on startup, but no video. I am just wondering if you ran into this kind of problem, and what it could be.
Thanks,
Mate
|
 Jp writes: Jp writes:
Hello Uli, I have the same issue as the fellow named kajgod. i was wondering if you could help me out with that problem with the battery not charging with my Ibook. The computer does not respond to my a/c adapter being plugged in to charge the battery. The battery has not died yet but i am afraid to let it die before trying to fix the problem. if you know any quick checks or overviews i could do on my computer i would love to hear your ideas. Thanks for reading.
|
 Uli Kusterer replies: ★ Uli Kusterer replies: ★
Sorry, haven't got a clue. Never had anything to do with an iBook's power supply.
There's small devices whith which you can test whether something has current, I guess you could use that to find out if the power supply itself is damaged, or the iBook, but that's all I can offer (or just attach it to a friend's iBook).
The plug on the power supply is custom, so I don't think you could cut it off and attach a new one easily if it's just a broken cable. And all the soldering points inside the iBook are really not serviceable unless you are an electronics professional. They're just too tiny, so I doubt you could replace the plug and outlet with non-custom ones.
|
 joe writes: joe writes:
Hey guys, Im new to macs and just bought an Ibook for school work. It works great, plenty of speed, enough hard drive for me, wireless internet..but there is one problem. The previous owner droped it a few times...once on the charging cord while it was plugged into the computer. So the full weight of the computer pressed the cord in, and I think it cracked the part the cord plugs into.
The computer will only charge if you either flip it upside down and prop the chargeing cord up, or if you flip it so it sits vertically then plug the cord in with a pencil underneith. It only responds to a slight pressure at a slight angle. It will not charge if you press hard. I also got a new charger for it, and the computer did the same thing with both chargers. If you are very lucky, it will charge while sitting up right and on, but it makes the computer act funny. The computer detects the charger, so it changes the screen brightness to "charger power source" but it wont actually charge unless if you prop it at the exact angle and pressure. If you bump it, it stops charging till you get it right.
Any ideas on how to fix this?
Right now, it works fine if you dont mind proping it upto charge.
|
 cico lichtgestalt writes: cico lichtgestalt writes:
hello i followed this steps and changed my harddrive for a 160Gb one but after puting everything together my ibook just dont turns on it dont make any sound no video but the caps lock bottom lights up.
do you have any idea in how to fix this?
|
 Chazine writes: Chazine writes:
You made a wonderfull job describing step by step the disassembling process for any ibook, originally intended for the change of the hard disk. But what concerning the tiny memory/time battery? It seems that my own is dead. Should I disassemble also the same way as for replacing the HD? Or is there a special trick? Many anticipated thks and Cheers.
|
 Uli Kusterer replies: ★ Uli Kusterer replies: ★
@Chazine: I don't remember offhand where the battery was, and I can't make it out on any of the pictures I have. But I'd expect the battery to be in a little plastic box on the main board (top side), so yes, you'll need to get at least that far, and you'll probably have to remove the shielding more than just carefully twisting it up to get at the HD.
|
 Rick writes: Rick writes:
ThaaaaanK Yoooooou!
I just picked up 9 of these little babies with unknown problems so this will help me to disassemble the things to work on.
Best Regards
Rick
|
 skinny greathair writes: skinny greathair writes:
awesome! this helped soo much, i know how to take apart an ibook and u helped me figure mine out so i could screw things up and wreck it. seriously though, the best!
|
 Paul Laird writes: Paul Laird writes:
Just completed the replacement of a dying HD on a G4 933mhz. One tiny screw left and idea where it goes - the thought of opening it up again for this is too daunting. And I had thought cracking open an iPod to replace a cracked screen was bad enough... until now I had always believed Apple used the KISS approach (Keep It Simple, Stupid).
Anyway a big thanks - now we have a rejuvenated iBook.
|
 NinjaVenom writes: NinjaVenom writes:
I took the G3 ibook 12" apart and replaced hardrive from another article that was nearly as good as yours. I have done this operation at least 4 times with 4 successes. I just got my kick in the crotch when I booted up. The mac turns on, starts to boot off the cd and shows the apple logo. Then the laptop shuts off completely. I wonder what I did wrong? I replaced the original hardrive which was just slow, not dead. It starts to boot in osx, and turns off. So it is not the new hardrive. I even hooked it up externally to my Mac mini and it works fine by usb cable. For a final test, I removed internal hardrive completely. I tried to boot from DVD, get the apple when the boot kicks in and then BLAMO! Same thing, shuts down completely. It should still start up and see no hardrive. It seems that the machine shuts down when the dvd or the hardrive osx tries to check the hardware. I have taken apart 5 times now. I am feeling hopeless. I tried to reset the pram, and the power cord with power button trick. I have reseated the memory and only connected necessary components...still same issue. I have the Mac half apart, with the battery just sitting in there, etc. I am not putting this back together until it boots properly.
|
 Uli Kusterer replies: ★ Uli Kusterer replies: ★
Did you try putting the old HD back in? Does that work? I wouldn't be surprised if the iBook made the assumption there was an HD and that causes the shutdown. Also, are you sure it's the right kind of hard drive and it is jumpered correctly? The Mac mini may be newer and support HDs that the iBook doesn't ... ? I'm only guessing here, though.
|
 Jonathan writes: Jonathan writes:
I really love your detailed info & pictures. I have been having a sudden panic failure constantly w/ my ibook g4 & it's killing me. i've gone through all of the web sites & apple's ideas, but I don't know how to narrow it down. I was finally able to get it into safe mode & network it via cable to an old windows computer I put linux on. I was able to at least save most of my docs. but I really need my ibook. it's my baby. :-) I can't figure out whether its a dc power whatever, the hard drive or the board. I can't get it to boot at all now. no whistles, messages in a lot of languages, freezes or anything. everynow and then the fan will kick on when I'm trying to start it. it makes a sound that sounds like its coming from the combo drive slot. unfortunately, I have no idea where my mac tiger original dvd is. any help is greatly appreciated.
|
 Uli Kusterer replies: ★ Uli Kusterer replies: ★
@Jonathan: I have no clue, but the way you say this, it sounds like your Tiger CD might be stuck in the drive, and the sound you're hearing was the drive spinning up the CD. I guess you already tried zapping the PRAM?
|
 Jonathan writes: Jonathan writes:
Uli,
Thanks for the response. Actually, I am pretty sure there is no cd/dvd in the slot drive. Yeah, I did several PMU & PRAM resets. I tried holding the shift key down & also tried the command s combo to go into single logon mode. those two methods worked when I first was able to get some data transferred & then used the fsck command to check the drive. But now it just will not start up at all. maybe I lucked out by getting what I did off the ibook before it completely crashed. I just wish I knew whether it needed just the dc power inverter replaced, the hard drive died, or if the logic board crashed. I pulled as many logs (panic, system, console, etc.) off of the laptop & printed them as well when I had it in safe mode before. They just don't seem to make sense to me. Anyway, I appreciate your feedback. Thanks.
|
 Jan writes: Jan writes:
I used this guide about a year ago to repair an old 600mhz iBook g3, that was lying arround the house for a couple of years already. It had a faulty display backlight. It turned out to be a broken cable at the joint that connects the screen to the computer itself. But a few weeks later I discovered another problem: the cooling fan did not work properly anymore. And i found out the hard way... While using the computer it suddenly shut down. And after a few seconds i smelled burnt plastic... so the old ibook went back to his dusty corner where i had only just saved it from. and a month ago i was searching the internet for a second hand imac g5 (i still am...) and i found an iBook g4 1.33ghz with some Ram/Hard drive problems. I bought it for �150,- (I live in europe) and replaced the hard drive with the old drive from the iBook g3. My dad had just upgraded the ram of his powerbook g4. so I replaced the ram as well. Now the iBook g4 works brilliantly. My powermac g4 broke down a week a go... so i'm really happy to have this iBook as a replacement. And i would have never acomplished that without this guide. so thank you very much!
|
 ferri writes: ferri writes:
I have a iBook G4 and now I'm forget the login pass word and cant login. I'm try with Mac OS CD while system is restarting and holding down the C key but I cand reset the password. If possible Please help me and solve my big problem in these days. thanks so much farzkh@yahoo.com
|
 Mark Nelson writes: Mark Nelson writes:
Found the discussions interesting. Have had occasional experiences with Macintoshes but was recently introduced to the iBook when my son had a problem display. I found a broken G3 for $50 and swapped the display with the G4. After opening display cover, remove only the 4 tiny "+" screws going into the side of the actual display. There is a multipin connector going into the back center of the display under the heavy foil. And another power plug coming from the corner of the display. If you don't take too much apart, it goes fairly quick.
Would be nice if the comments were timestamped.
|
 Jerry writes: Jerry writes:
Thanks for the article, I have already torn my G3 iBook 500 apart and re-soldered the mouse plug on, it was broken free when I purchased it off Ebay on an AS IS auction for 49 bucks, this required a total dissassembly of the machine, even had to take the motherboard off the frame work so I could get at all eight legs. I will give Apple a kudo though the way they have it mounted allowed a nice resolder without problems that I have experienced with PC laptops the legs were simply tinned as well as tinning the mounting points, then hold the part in place and run the iron over the legs attaches everything as it was before the rip loose.
Wish I had thought of changeing the hard drive then but I wanted to make sure that the mouse worked right before I replaced the HD it has a working 10 gig filled with nice software but I have a 40 gig that I took out of my Compaq a few months ago and put in my old Lombard that I want to put in this unit so I can have lots more software and a few tunes installed on.
I also found an outfit on Ebay that sells keys for the keyboard, and this unit came with the delete key here but one peg broken. Cost a bit over 3 bucks for the key whilst the keyboard would have run over 15.
At any rate thanks much for the turorial I reviewed it just now and will use it when tackel the brain transplant next week.
|
 olh writes: olh writes:
Many thanks for this site.
My iBook 12" 600MHz (PowerBook4,1) has now a new hard drive, a Samsumg 160GB HM160HC.
Please note the firmware in target disk mode and also OSX 10.4 see only 137GB, while Linux can use the full capacity.
I used this site, the harddrive tutorial from ifixit.com and ibk_dusb.pdf from Apple.
It took me 3 hours, with breaks inbetween, to take the iBook apart, 1 hour to reassemble it again.
|
 Cathy writes: Cathy writes:
Thanks for the detailed instructions. I'm getting ready to undertake this project. I've got a white iBook, G3 with what I'm being told has a bad logic board. I want to get the back cover off and insert a shim, as I've read on the Internet, may be a fix. If this doesn't work I want to remove the hard drive and place it in my older iBook, clamshell tagerine model.
My question is how to I get the upper left and right screws out? I'm using a hex key and think I may have stripped these in the process. They're the only two very little things keeping me from removing the bottom casing. If you can help, thanks!
|
 Uli Kusterer replies: ★ Uli Kusterer replies: ★
Cathy, you have to be very careful with those screws. They're special in that you need a particular key to get them out. Apparently, there's two very similar ones (IIRC one was metric, the other imperial, or so). One of them seems to fit but doesn't. The other one actually does fit.
The almost-fitting one will lose traction and not really work, but look like it just so fits, so get the proper one and it should work. If you really forced it, and the screws are damaged too badly, you're in trouble.
In that case you'd have to get someone to saw a slit into the screw head so you can pull it using a regular screwdriver or drill away the screw head (which lets you open the case) and then pull the rest of the screw out using a pair of pliers. Both things should only be done by a professional. If you drill away too much, you might not be able to pull the screw at all.
Problem is getting the proper key. You'd have to go to a specialty store, probably, otherwise you'll just get the same key again.
|
 Matt Sawatzky writes: Matt Sawatzky writes:
Thanks for the guide. It was quite helpful. This is just another reason I'm not a fan of Macs. The new ones are fine for removing the HDD and RAM, but these old ones are brutal. This helped out.
|
 Joff Mac writes: Joff Mac writes:
I have a broken plug on the power adapter for my brothers iBook, and i was thinking of hard wiring the power adapter into the laptop, is that possible?
|
 Ron writes: Ron writes:
My wife was just given an ibook g3 12 inch, has a 20 gig hard drive Will be replacing it with a new one, any idea what I should get? Was thinking about Samsung Spinpoint M5 HM160HC. Also will be installing 10.3 instead of 10.2 that came with it. What do you think? Thanks for the above instructions & your reply.
|
 Stux writes: Stux writes:
After all these years, still the best guide out there.
Just had to take apart two old iBooks to scavenge their HDs.
Sigh. The iBook G3 is the Mac which made refuse to ever change the HD in a Mac Laptop again.
|
 General Disquiet writes: General Disquiet writes:
Well, the instructions are brilliant - as far as they go. I wanted to change the combi drive on my G3. All went well until I got to the last bit of separating the aluminium from from the upper casing. I could release it on 3 sides, but failed to get it to release from around the screen hinges - it felt as if there were more screws there, but I'd taken out all those referred to.
I had to give up at this point and reassemble everything - so frustrating.
Any suggestions would be welcomed!
|
 Sara writes: Sara writes:
Hi! Great write up! Thanks for documenting and sharing. Do you know if the screw sizes are the same for a iBook? Per chance? Lots of garbage on the 'net these days hard to find great sites like yours chock full of INFO. :D
I replaced my screen once and it was oddly gratifying. I love macs! Especially old ones. Mine is about as sturdy as fisher price toy. :D
|
 headsign writes: headsign writes:
Thanks! Great tutorial!
P.S. Hey! Rentsch! Isn't it a small world? :)
Mat (the guy from Germany who made the C3 logo)
|
 Tinker writes: Tinker writes:
This article was just what I needed. Saved me a bunch of time. Thanks you so much.
|
 Ed writes: Ed writes:
I just changed the HD on a newly acquired G3 ibook. Actually, I just changed the G3 ibook on my old disk. The evil graphic chip problem had surfaced 2 years ago. I had old music recording hardware/software which I wanted to continue using with my old ibook, retiring it to that one specific job. So I got an old ibook and transplanted the HD. I remembered this article from 2 years ago, and tried googling "taking apart ibook" and this article came up as No. 1!! After all these years, it's a classic! Anyway, what I did was take pictures of each surface before taking the screws off, printed the picture and taped the screws to it.
If you want, I can upload the pictures so anyone wanting to do the operation can print them out and use them. Just let me know. Didn't have a stuffed moose available though, sorry.
|
 Christopher harrison writes: Christopher harrison writes:
Uli fantastic job
Thanks again for a formidable project to help us all beautifuly done much better than apple services
thanks Chris
|
 steve writes: steve writes:
Seriously... You rock big for posting this! A MOST excellent job you did! |
|  |
![[ Zathras.de - Uli's Web Site ]](http://zathras.de/angelweb/themes/barsnstripes/img/masthead_blog.jpg)
![[ Zathras.de - Uli's Web Site ]](http://zathras.de/angelweb/themes/barsnstripes/img/masthead_blog.jpg)